Friday, 24 August 2012
DSDN 112: P.2 Navigation Interface first tutorial
Today in the tutorial each of us had to find somewhere in the campus to put the piece of paper that said the prize on it and then we had to write down word instructions or draw a map that tells you how to get to the prize. After we have done the instructions or the map, we give it to the people that's in our tutorial group and see if they can find the prize. Doing this is a good practice for our second project which is 'Navigation interface', since this project is pretty similar to designing a Gps. We also found out some advantages and disadvantages for maps and word instructions.
Thursday, 23 August 2012
DSDN 142: Final Set

Here are my final sets of panels that I've done. I've added more colours to them and just left a little bit out with just white. I combined my inspirations together which was Tetris and Gameboy colours, and took it further from there to be able to create structure and noise. So overall I'm pretty happy how this turned out.
DSDN 142: Chosen final panel

This panel is the one that I choose to use for my final one, I think it goes well with my third panel because some of the squares are quite close to each other and they are at a reasonable spot, like they aren't all over the screen. If you have a look at my third panel on the bottom, the squares on that one are still pretty close with each other, so I didn't want to have my final panel with the squares separated from each other heaps.

DSDN 142: Experiments for final panel

Here is my first experiment that I did for my final panel, I think that this one doesn't go with the noise from my third panel very well because the squares are separated from each other too much and some of the squares are almost like connected together in like strips.

This one is my second experiment that I did , this one is a bit different to my first experiment but the sqaures are still seperated from each other too much.

This one here is getting a bit better because the squares are actually closer to each other, unlike the other two experiments that I did. I'm just going to stick with this panel and develop it more and see if it will connect with the third panel.
DSDN 142: Second and third panel

This here is my second panel, as you can see the squares are starting to separate from each other in different directions. I still have to add more colours to the squares. The reason I made them separate is that so it can show the noise as well as the structure.

This is my third panel, the colours are just like my second panel, so I got to add more colours to them both. In this panel the squares are just separating more from each other.
DSDN 142: Final idea

Wednesday, 22 August 2012
DSDN 142: Experiment for first panel

Since Tetris was my inspiration, I decided to experiment with that idea for my first panel and this is how it turned out. I was planning onto making the shapes from the top real light coloured and when they are traveling down, the colours get darker and darker. As you can see the colours on the bottom are darker than the ones at the top.
Tuesday, 21 August 2012
DSDN 142: Starting point Ideas

This is what I'm planning to use for my starting point since tetris blocks were my inspiration, but I'll probably change it to a different colour or mix other colours to it instead of just leaving it plain blue.
 This is another idea for a starting point, the squares in this one are separated from each other instead of them connected together.

DSDN 142: More inspiration

I was inspired by Tetris blocks because when I looked at them, they just look like simple squares and I wanted to keep my idea quite simple. I'm planning to use squares like Tetris blocks for my project, maybe make them form like a rectangle shape for my starting point and put colours on them.

My tutor today gave me an idea for the colours I could use for my squares, which are bright colours like from a gameboy and those are the colours that's used on Tetris blocks as you can see in the image above. I'm going to try put those colours on my squares and see how they will turn out together.
Monday, 20 August 2012
DSDN 104: Illustrator trace model

Here are the rough traces of my model that I did on Illustrator, they are stuck on cardboard now and are about to get pinned together with wire.


DSDN 104: Rough traces with Illustrator

Here are the rough traces of my sliced models that I did using Illustrator, I'm about to print them out then stick them onto cardboard to make a model out of it. I still have no idea what techniques I'll use to put my model together yet so I'll probably try a couple of different techniques with some practice models.
DSDN 104: Slicing my model


Sunday, 19 August 2012
DSDN 112: Final Interactive design


Here are my eight photos that I took of my interactive design object, there is one image in here showing a person interacting with my object. Other photos just show what my object does and just different shots of the objects itself.
I was a bit disappointed how the paint job of the dices turned out because of the bad weather conditions in the weekend, I try touch it up a little bit, but it still look quite rugged. I couldn't just re- paint it because it wouldn't of dried up on time for the hand-in, but oh well at least my idea worked out in the end.
The board is a sheet of metal covered with black and white paper, the reason I covered it and made it like a checkers board because I wanted to create a board for the dices to be rolled on. I feel that a checkers board would of been the best board for it because dices do get rolled on them and they are just simple looking.
The dices worked out in the end, I put two magnets in each dice, so one magnet on one corner of each dice. I drilled a hole on the corners and put the magnets inside it, then I covered it up with wood putty, sand and paint it afterwards. Putting two magnets in each dice did get my idea to work out because it's more likely to land on the corner with two magnets instead of just one.
DSDN 112: 200 words
| ||
Basically I wanted to make the objects that look exactly like dice’s and with a checkers board on the
side but modify them to be more interactive with the user. So what I wanted the users to experience is that, when they look at the dices, they will just look like two ordinary dices and when they roll them on the checkers board they will just land on one of the faces. But when they do roll them, they will get an unexpected outcome because the dices will land on its point instead of on one of the faces. What I’ve done is that I’ve put two magnets inside each cube on the corners and the checkers board is metal so when the dices have been rolled, wherever the magnets are is where it will stick on the board.
Instruction
As you can see, there should be two dices and one checkers board in front of you. First make sure
that the dices aren’t stuck next to each other or on the checkers board. Don’t roll the dices with one hand at the same time because it won’t work. So just roll one at a time, you can try rolling both dices with one on each hand, but it only works occasionally. After you have rolled them, you will experience an unexpected outcome, which is the dices landing on its corner. Try again if it doesn’t work the first time |
Saturday, 18 August 2012
DSDN 112: More updates on my object
I've got some neo-rare earth magnets to try out on my object because they are more powerful than the magnets I had before. I've cut the corners flat on my cube so it will land on the point easier, I've drilled a hole in it to put the magnet in and just masking taped it just for now. After the magnet is in, I rolled the cube on a piece of metal a few times and my idea seems to be working with those new magnets that I've got, but sometimes it doesn't land on the point. I got to make sure it lands on the point every time pretty much, so I'm going to try drill a hole on a different corner on the cube to put another magnet in and hopefully that will work out. I'm now going to make two cubes instead of just having one and going to paint them so they look like a dice. I was going to just make one cube and make the faces of the cube have colours instead of numbers of a dice, but I thought about it and I feel that making it look like a dice will be more interactive.

Thursday, 16 August 2012
DSDN 142: P.2 Sketches

Here are some sketches that I did to give me ideas for this second project. I got the ideas for these sketches from my precedent images.
First idea - The panels shows an explosion of square shapes, the first panel shows the squares are all stuck together, then on the next panels the squares are moving away form each other and the last panel the squares are all over the panel.
Second idea - Second idea is a shooting star. The panels have little stars all over it and a shooting star is appearing on each panel slowly like a stop motion. As you can see the shooting star is going down diagonally, starting from the top right hand corner and it shoots out of the left bottom corner.
Third idea - Third idea is fizzing bubbles, as you can see in the image the bubbles are starting to fizz from the bottom of the panel, the bubbles fizz more and more on the next two panels. On the last panel bubbles are just all over the place.
DSDN 104: Laser cutting inspirations


DSDN 112: Update on my object
At the moment I still haven't got my idea to work on my object, I've done several prototypes but they still don't work. First I was doing prototypes on gold foam which they didn't really work out, so I thought it might be different if I do it on wood which I was planning to use for final material, but it was just the same. I have a feeling that it's because my magnets are not powerful enough since they are only arts and crafts magnets, and also the edge of my object is not heavy enough to be able to make it self land on everytime. If I made one of the corners heavy on my object, it won't be very interactive because people will probably know what the object does, so I'll try keep the weight quite even. I'll also try out some more powerful magnets and hopefully that works out.
DSDN 104: P.2 Precedent

Since my hero model have a quite a lot of curves on it, I could consider bending my acrylic like this model here in the image or I can just get it laser cut with curves on it without bending it. I'll have to see how the model will turn out when I section it or slice it first.

I was thinking about making a stand for my acrylic model for it to be able to stand up like this one in this image. Since my model pretty much have curves all over the model, it won't be able to just stand up by itself so I think the bottom flat rectangular shaped part of this stand will be perfect for it.
Tuesday, 14 August 2012
DSDN 142: P.2 Inspiration

This is an image of abstract patterns that I found, what I like about this is how it has twisting movements to it, this is like an illusion image and I can imagine the noise of it that's on those cartoon shows. I think that developing this image and pushing it further will be quite interesting because I can see how crazy it can get if you do more twisting to it.


I looked at images of stars and I thought it will be pretty wicked to to do because I can probably have a look at doing shooting stars or something similar.
Monday, 13 August 2012
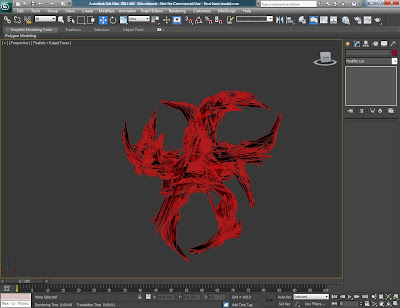
DSDN 104: Final hero Model

Here is my final rendered hero model, I ended up applying a blood splatter texture to it because I feel it relates to my theme chaotic/violence real well, I've used lighting with a plane to be able to bring out the colours. I've ran out of time to be able to photoshop the plane out but I'll have to leave it there.

DSDN 104: More development for hero model

Modifiers: Clone + Edit mesh
 Modifiers: clone + Edit mesh + rotating+ material
 Trying a different texture
Modifiers: clone + edit mesh, went back to my orginal texture


Modifiers: clone + edit mesh, went back to my orginal texture
DSDN 104: Hero Model developments

Modifiers: Bend + Twist

Modifiers: Bend + Squeeze + Wave

Modifiers: Bend + Twist

Modifiers: Mirror + Edit mesh + Twist
Subscribe to:
Posts (Atom)